
- admin
- 0 Comments
- 4384 Views
As a developer building web applications with Next.js, staying up-to-date with the latest releases is critical to leverage new features and ensure optimal performance and security. The recent release of Next.js 13 introduced many improvements and changes over the previous version 12 that you have likely been using. To fully take advantage of Next.js 13 in your projects, you need to understand how it differs from version 12 and what is required to migrate your existing apps. In this article, we will explore Next.js 12 and 13 in depth. By the end, you will have a firm grasp of pre-rendering methods, server and client components, file structure differences, page and API routing updates, data fetching, and all other key variations between these two versions. With this knowledge, you will be well on your way to migrating your Next.js apps to version 13 and building faster, more powerful web applications.
Understanding Next.js Pre-Rendering: SSG vs SSR
Next.js has two forms of pre-rendering: Static Site Generation (SSG) and Server-Side Rendering (SSR).
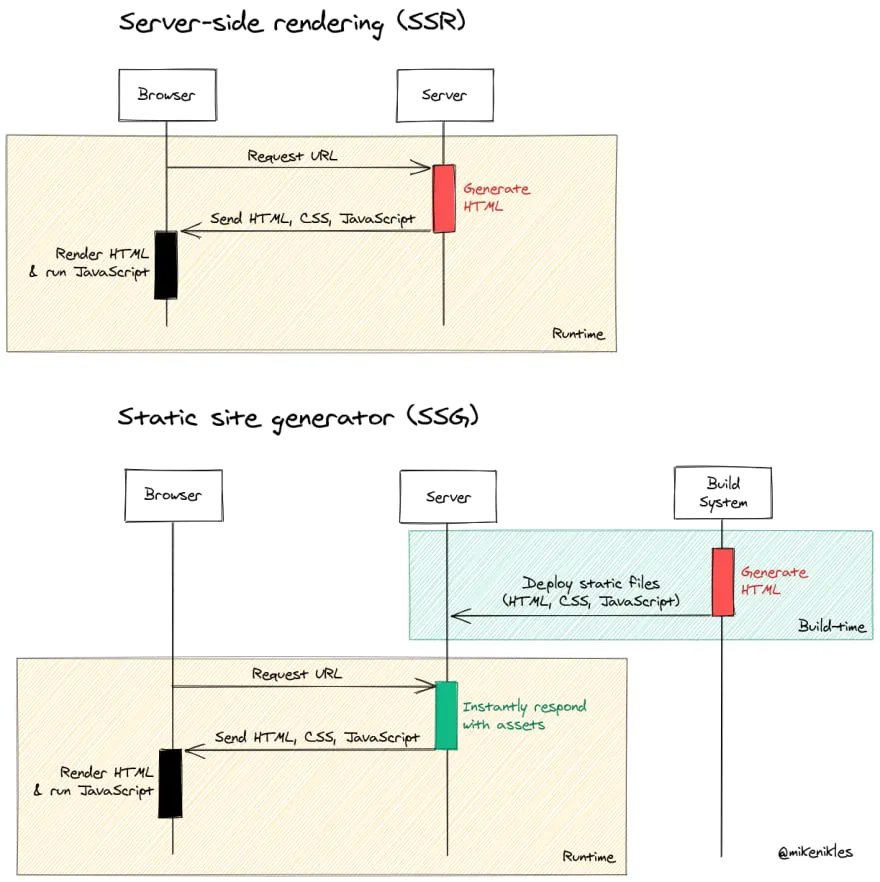
The diagram above shows the difference in rendering processes between SSR and SSG.
SSG (Static Site Generation)
With SSG, HTML pages are generated at build time. This means that for each page, Next.js generates the HTML during build and saves it to disk. When a request comes in for that page, Next.js serves the pre-rendered HTML.
SSG is beneficial for SEO since the page is pre-rendered, allowing web crawlers to index the page. It also has faster load times since the HTML is generated at build time. However, SSG pages cannot have dynamic routes and cannot fetch external data at request time.
SSR (Server-Side Rendering)
With SSR, HTML pages are generated on each request. When a request comes in, Next.js renders the required component(s) to HTML on the server and sends it as a response.
SSR allows pages to have dynamic routes and fetch external data on request. However, SSR can be slower since the HTML is generated on each request. SSR pages are also less optimized for SEO compared to SSG pages.
In summary, it depends on your use case. If you need SEO, static URLs, and fast load times, use SSG. If you need dynamic routes, external data fetching, and interactivity, use SSR. For the best of both worlds, you can also implement hybrid rendering using SSG for static parts of the page and SSR for dynamic parts of the page.
What’s New in Next.js 13: File-System Routing
With the release of Next.js 13, file-system based routing is now the default. This means you no longer have to define routes in pages/routes.js. Instead, you can create files like pages/posts/hello-world.js and it will automatically become the /posts/hello-world route.
Benefits of File-System Routing
There are a few key benefits to file-system routing:
- Simplicity. Routing becomes very intuitive since you’re just creating files and folders. No more manually defining routes.
- Scalability. As your app grows larger, file-system routing scales much better than manually defining many routes.
- Type safety. Next.js will automatically generate TypeScript types for your pages based on the file/folder structure.
Migration Steps
Migrating from Next.js 12 to 13 with file-system routing only takes a few simple steps:
- Remove any routes defined in pages/routes.js
- Create pages/posts/hello-world.js to define the /posts/hello-world route
- Create pages/posts.js to define the /posts route that will serve as the index/parent route
- Update any and router.push() usages to the new file-based routes
- Remove any getStaticPaths/getStaticProps usages from getStaticPaths/getStaticProps in pages/routes.js and move them to the new file-based pages
That covers the basic migration steps to move from route definitions in pages/routes.js to file-system based routing in Next.js 13. Let me know if you have any other questions!
Upgrading to Next.js 13: Changes to Pages and Layouts
To upgrade from Next.js 12 to 13, there are a few key changes you’ll need to make regarding pages and layouts.
Next.js 13 introduces a new file-based routing system. This means you’ll need to rename pages/posts.js to pages/posts/index.js. The same applies for pages/posts/hello.js which becomes pages/posts/hello/index.js. This allows you to create subfolders within pages and Next.js will automatically generate routes for posts/hello/other.
Dynamic routes also get an update. Previously, you defined dynamic routes as pages/posts/[id].js. Now, you’ll define them as pages/posts/[id]/index.js. This follows the new file-based routing structure.
Layouts in Next.js 13 also introduce new abilities, such as nesting layouts within one another. You can now have a pages/_app.js layout, as well as pages/posts/_layout.js which wraps only /posts pages. Layouts in subfolders will wrap pages in that subfolder and any subfolders within it.
Next.js 13 also allows you to export multiple components from a single file. So you can have:
```js
// pages/posts/hello.js

export { default as Post } from './Post'

export { default as Author } from './Author'
Then you can import Post and Author into pages/posts/hello/index.js.
Finally, with the file-based routing changes, you’ll need to update all image, link, and navigation paths in your Next.js app. Anything linking to /posts will need to be changed to /posts/index. The same applies for any dynamic routes.
By following these key changes regarding pages, layouts, routing, and exports, you’ll be well on your way to upgrading your Next.js app from version 12 to 13. Let me know if you have any other questions!
Migrating API Routes From V12 to V13
Migrating your API routes from Next.js 12 to 13 requires a few minor changes. The good news is that the majority of your existing API routes will continue to work as-is. However, there are some key differences to be aware of:
File Location
In Next.js 12, API routes were defined in pages/api and pages/api/*.js files. In Next.js 13, the file structure has changed to pages/api/. For example:
| Next.js 12 | Next.js 13 |
| pages/ api/hello.js |
pages/ api/ – hello.js |
This new nested structure provides a cleaner way to organize your API routes.
Exporting the API Route
In Next.js 12, you exported the API route handler function like this:
```js

// pages/api/hello.js

module.exports = (req, res) => {

res.status(200).json({ text: 'Hello' })

}
In Next.js 13, you must export the handler function as default:
```js

// pages/api/hello.js

export default (req, res) => {

res.status(200).json({ text: 'Hello' })

}
Using Middleware
To use Express middleware in your API routes in Next.js 13, you must import the Next.js middleware helper. For example:
```js

import middleware from 'next/middleware'

const myMiddleware = middleware((req) => { / ... / })

export default myMiddleware(handler)
The middleware helper initializes a wrapper function to handle the API route.
Query and Params
In Next.js 13, req.query and req.params are now proxied. So you can access them directly as query and params. For example:
```js

export default (req, res) => {

const { query, params } = req

// ...

}
Migrating your API routes to Next.js 13 will provide a cleaner structure, improved middleware support, and a simplified API. By following the steps outlined here, you’ll be serving API routes in Next.js 13 in no time!
Fetching Data in Next.js 13: Incremental Static Regeneration
Next.js 13 introduced Incremental Static Regeneration (ISR), which allows you to statically regenerate pages after deployment. This enables static sites to have dynamic data by re-generating pages on each request.
How ISR Works
ISR builds on Next.js’ Static Site Generation (SSG) and Server-Side Rendering (SSR) features. With ISR, Next.js will:
- Generate HTML for pages ahead of time during build time (SSG)
- Serve the pre-rendered HTML to clients on request
- Re-generate HTML for pages in the background after they have been requested
- Serve the fresh HTML to clients on subsequent requests
This allows you to have static pages with frequently updating data.
Using ISR
To use ISR, you need to:
- Export a
getStaticPropsfunction from your page - Set a
revalidateproperty ingetStaticPropswhich tells Next.js how often to re-generate the page in seconds.
For example:
```js

export async function getStaticProps() {

const data = await fetch('https://.../data')

const items = await data.json()

return {

props: { items },

revalidate: 60 // regenerate every 60 seconds

}

}
This will generate the page at build time, serve it to the first request, re-generate it in the background after 60 seconds, and then serve the fresh page to all subsequent requests.
Benefits of ISR
The main benefits of ISR are:
- Fast page loads since you get pre-rendered HTML
- Dynamic data since pages re-generate
- Can work with any data source (API, CMS, database, etc)
- Minimal latency due to background re-generation
ISR allows you to have a fast static site with frequently updating dynamic data. By balancing how often your pages revalidate, you can optimize for speed and freshness.
Migrating to Next.js 13 will allow you to utilize features like ISR to build faster, dynamic sites. I hope this overview on data fetching in Next.js 13 was helpful! Please let me know if you have any other questions.
Using Server Components in Next.js 13
Using Server Components in Next.js 13
Next.js 13 introduces server components, which allow you to build reusable components that run on the server and the client. This enables new capabilities like:
- Fetching data on the server
- Generating static pages at build time
- Streaming HTML responses
- etc.
Defining a Server Component
To define a server component, you export a function from a .server.js or .server.tsx file:
```js

export function getServerSideProps() {

// Fetch data from external API

const res = await fetch(https://...)

const data = await res.json()

// Render data...

return { props: { data } }

}
Then you can render the data from getServerSideProps() in your component:
```jsx

function Page({ data }) {

return

{data.title}

}

export default Page
Fetching Data
You can fetch data on the server in getServerSideProps(). This function will be called at request time on the server, allowing you to fetch external data and pre-render it.
For example:
```js

export function getServerSideProps() {

const res = await fetch('https://.../data')

const data = await res.json()

return { props: { data } }

}
The returned props will be passed to your page component as props, allowing you to render the data.
Differences from getInitialProps()
The main differences from getInitialProps() are:
getServerSideProps()runs only on the server. It will never be run on the client.- You can access the request object (
req) which provides information about the incoming request.
When to Use getServerSideProps()
You should use getServerSideProps() when:
- You need to fetch external data for pre-rendering.
- You need to access the request object (
req) to get information about the request. - The data for the page depends on the request path or query parameters.
This allows you to pre-render pages with data that depends on the request.
In summary, Next.js 13’s server components and getServerSideProps() enable new capabilities for fetching data and pre-rendering pages. You can now build more complex applications with Next.js using server-side rendering and pre-rendering.
Client Components: A New Paradigm in V13
Client Components: A New Paradigm in V13
Next.js 12 relied primarily on server-side rendering (SSR) to generate HTML for pages. In version 13, Next.js introduced client components, which expand the functionality of client-side JavaScript (JS) in Next.js apps.
Client components are written in JSX and compiled to JS, similar to React components. However, unlike regular React components that are bundled into the initial HTML, client components are lazy-loaded at runtime. This means their JS is only loaded when the component is first rendered.
Some key benefits of client components are:
- Faster initial page load – Since the client component JS is lazy-loaded, the initial HTML is lighter. This improves page load performance.
- Isolated scope – Client components have their own scope and state, separate from server components on the page. This encapsulation makes development easier.
- Dynamic rendering – Client components can render content dynamically based on external data or user interaction. This was difficult with SSR alone.
- Compatibility – Client components work seamlessly with existing server components, so you can adopt them incrementally in your Next.js app.
To define a client component, export it from a file named ComponentName.client.js or
The Hello component will be lazy-loaded when the Home page is rendered, demonstrating the power and flexibility client components bring to Next.js apps. Migrating to Next.js 13 gives you access to this and many other new capabilities to build fast, dynamic user experiences.
Comparing V12 and V13 Routing and Asset Handling
The latest versions of Next.js, 12 and 13, introduced significant changes and improvements over previous versions. When migrating from Next.js 12 to 13, it’s important to understand how routing and asset handling differ between the two versions.
Version 12 utilized file-system based routing, where the file name determined the route. For example, pages/about.js mapped to /about. Version 13 introduced explicit page routing where you define routes in pages/routes.js. This provides more flexibility and control over routing. For example:
```js

export default {

'/about': 'pages/about.js'

}
This will map /about to pages/about.js. You can now map multiple routes to a single page component.
Version 13 also introduced API routes, defined in pages/api. For example, pages/api/users.js will handle requests to /api/users. API routes have access to req and res, allowing you to build REST and GraphQL APIs.
In terms of assets, Version 12 bundled all pages and assets into a single JS payload. Version 13 introduced the concept of “chunks” which splits the JS bundle into smaller pieces to optimize loading. It also utilizes file-system based routing for assets, so /public/images/photo.png is served at /images/photo.png.
When migrating from V12 to V13, you’ll need to:
- Move getInitialProps to getStaticProps or getServerSideProps
- Define page routes in pages/routes.js
- Move API routes to pages/api
- Update image/asset references to use the file-system based routing
- Make sure pages are named correctly based on the new routing system
- Consider code splitting to leverage chunking
By understanding these key differences in routing and asset handling between Next.js 12 and 13, you’ll be well on your way to a successful migration. The improvements introduced in V13 are well worth the effort.
Next Steps After Migrating to Next.js 13
Now that you have successfully migrated your Next.js app to version 13, there are a few next steps you should take to ensure optimal performance and functionality.
Update Dependencies
Be sure to update any third-party dependencies to versions that support Next.js 13. Some may have breaking changes, so check their changelogs and update accordingly.
Review Routing Changes
Double check that your page and API routes are working as expected. Next.js 13 introduced file system based routing, so routes are now defined by files and folders. Ensure any dynamic routes, catch-all routes, and fallback routes redirect properly.
Check for Deprecations
Review the Next.js 13 changelog to see if any features you were using have been deprecated. Make any necessary changes to avoid issues going forward. For example, the next/dynamic import is now named next/dynamic.
Enable New Features (Optional)
Take advantage of new capabilities in Next.js 13 like server components, React 18 support, webpack 5, and more. Server components allow you to build APIs by declaring server-side endpoints in your app. Upgrading to React 18 and webpack 5 provides performance benefits.
Update Docs (Optional)
If you have documentation for your Next.js app, update it to reflect the changes in version 13. This will help any new developers get up to speed and allow existing developers to leverage new features.
Test and Deploy
Thoroughly test your Next.js 13 app to ensure there are no issues. Once testing is complete, you can deploy as usual. Your app should function as expected, now built on the latest version of Next.js with additional capabilities and optimizations.
Migrating to the newest version of any framework or library requires effort, but keeping your software up-to-date provides significant benefits. Following these next steps after upgrading to Next.js 13 will ensure your app is poised to utilize the latest and greatest that Next.js has to offer.
Conclusion
As you’ve seen, Next.js 13 introduced many new features and improvements that make building applications more seamless and powerful. From simplified file-based routing and data fetching methods to automatic static optimization, the latest version is a significant upgrade. While migrating an existing project will require updating syntax and configuration, the long term benefits to performance, scalability, and developer experience are well worth the effort. With a full understanding of the differences covered in this guide, you’re now equipped to upgrade your Next.js apps to version 13 and build faster, more robust web experiences. The future of hybrid static and server-rendered React apps is bright.
More helpful articles can be found by clicking here


